Get ready for a fun challenge!
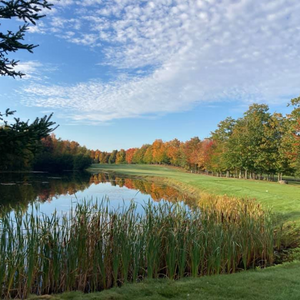
Fashioned from an old family farm close to Lewiston Auburn, Brunswick and Augusta in scenic Central Maine, The Meadows has matured nicely since Bradley Booth designed it in the late 1990’s. Although not long in distance, strategic hazard placement, winding fairways and quick, undulating greens provide the course with a lot of protection and challenge. There are several tee options to provide anyone from expert to beginner an enjoyable day on the course.
USGA Yardage/Stroke & Slope Rating
MEN:
- Blue: 5,830 yards 67.8/121
- White: 5,343 yards 65.7/114
- Gold: 4,909 yards 64.1/110
WOMEN:
- White: 5,316 yards 70.3/123
- Red: 4,487 yards 65.7/110
USGA Rules Governs All Play
Yardage is measured to center of the green:
White = 150 yards
Red = 100 yards
Scorecard
Our Golf Shop
We have all the essentials including gloves, tees, balls, sunscreen, a good selection of apparel, logo gear and much more!
Hole By Hole
Hole 1 – Par 4
The opening hole plays downhill from a series of elevated tees to a broad fairway that lazily sweeps left. The final approach to the green is a narrow corridor heavily guarded on both sides by a hazard. The green pitches in every direction and was designed to test your short game skills. If your approach shot lacks precision it may careen off the green leaving a difficult up and down.
Hole 2 – Par 4
The par four 2nd hole, plays a dogleg from right to left. From the tee it is 265 yards downhill through the dogleg. Your target from the tee will be a stand of birch trees. You can expect a generous role from the fairway, so your club selection should be something less than a driver. The final approach is played over a brook usually from a downhill lie to a green that is well guarded by bunkers.
Hole 3 – Par 3
The par three 3rd hole is a test of your mid-iron shot making skills. The green is guarded on the left by the deep bunkers, to the right side it drops off down a steep bank, and to its rear there is water. The modest size screen has multiple levels that will be tough to par if you don’t put your tee shot close to the pin.
Hole 4 – Par 5
You will need to carry your tee shot at least 225 yards to place yourself in good position past the hazard that crosses the fairway from the end of the pond. Because you still cannot see the green, a wise play for the second shot may be to lay up just in front of the fairway bunkers guarding the final approach to the green. From there you will be left with about 80 yards to the front of the green. Because the green is well sloped to the back, off its mid-section, a safe play will be to find the front face of the green with your approach shot.
Hole 5 – Par 3
The elevated tee area of the par three 5th hole plays over a marsh to a large kidney shaped green well-guarded by large bunkers on both its left and right sides. The green slopes to the front and to the back off the ridge that runs across the Green’s mid-section. If your ball should find a bunker it will be tough up and down to make par.
Hole 6 – Par 4
Most players will choose to divide and conquer this 388 yard par four. It is 250 yards to safely carry the hazards that guard the narrow fairway at the slight dogleg right. The double-green is shared with hole 14 and calls for a solid approach to a green that slopes from the left near to the right front.
Hole 8 – Par 4
This challenging par four, 8th hole, plays uphill with a slight dogleg to the right. Its large green sits on a plateau guarded on three sides by bunkers. You’ll need a well struck tee shot to carry you up the hill into the dogleg. Anything less will leave you with an uphill lie and a blind approach.
Hole 9 – Par 4
Though your tee shot must be soberly positioned to avoid trouble to the right, the par 4th offers a generous landing zone. Your approach to the modest size front elevated green will be slightly uphill. The green is guarded on the right by one large bunker and to its left there is a thickly grassed knoll. The greens surface is relatively flat and will allow you to go at the pin with a well lofted approach shot.
Hole 10 – Par 5
The double dogleg 10th requires a well-placed tee shot just left and past the out-cropping of trees at the first dogleg. From there, most players will want to place their second shot to an area just past the first bunker on the left side of the fairway. With most pin placements, a well calculated pitch and run may be the best shot for finding the green and getting the ball close to the pan.
Hole 12 – Par 4
The par four 12th plunges nearly 300 yards downhill to the brook that cuts across the lower part of the fairway. A well-placed tee shot to the left of the fairways center will keep the water hazard on the right side of the fairway out of play, and offer a flatter lie for your approach shot. The large green is multileveled and cleverly pitched. Add to that, the two bunkers that guard its right and left front make this whole one of the courses toughest playing approach shots.
Hole 13 – Par 4
On the par four 13th, you’ll want to negotiate your tee shot down the left side of the tree-lined fairway. A five wood or long iron should be enough club to carry you well into the dogleg. With a good tee shot players will be within wedge range of the green. Cleverly guarded by a steep wall bunker on the right front, the undulating green will offer a challenging target for your final approach.
Hole 14 – Par 4
You’ll need a laser drive on this narrow par four 14th. Starting out over water and playing to a fairway that leaves the player very little room for mistakes. At 200 yards from the blue tee, hazards close in from both sides of the fairway. The double green which is shared with hole #6 is slow to the front and guarded by deep rough on the front and right side.
Hole 15 – Par 3
The par three 15th, will test your distance control and accuracy. The back side of the green drops off significantly into a brook. Most of the front is guarded by a bunker. The green surface rolls off left and right from a ridge running through its center. Your tee shot will require some imagination to get the ball close to the pin.
Hole 16 – Par 4
This 345 yard par four, plays steeply uphill to a sharp dogleg left. Distance off the tee will be greatly rewarded. A tee shot falling short of the fairway’s sharp left turn will leave an approach shot over or around 100 foot tree from an awkward side-hill lie. The green is moderately large and will require a well-planned approach to keep the ball on the putting surface.
Hole 17 – Par 3
The par three 17th is a shot maker’s hole. Bunkers guard both left and right sides of the green cleverly placed there to capture that pushed or pulled tee shot. Most players will choose to safely aim their tee shot at the left-center of the green hoping to take the bunkers out of play and preventing the ball from finding its way off the greens sloped backside.
Hole 18 – Par 4
The finishing hole is a par four, which plays uphill and requires a booming tee shot to put you in good short club ranged for your approach. A series of grassy, rolling knolls border the left edge of the fairway. If your tee shot should wander into those hazards you’ll have a difficult job to get on the green in regulation. Elevated and guarded by bunkers on both flanks, the medium-sized green is receptive to holding a solid approach shot.
Business Hours
Tues. - Wed. 9am-8pm,
Thurs.- Sat. 9am to 9pm
Sun. 9am-8pm
PUB HOURS:
Mon. Closed
Tues. & Wed. 11a - 8p
Thurs. - Fri. 11a - 9p
Sat. 8a - 9p
Sun. 9a - 8p